Back Shop is supported by Craft—designing Nordic ski collections worthy of World Champions and Everyday Heroes. craftsports.us
Your pole tips: tiny, thin pieces of plastic and metal small enough to hold in your hand. But no piece of equipment so small can cause so many headaches on the trail if things take a turn for the worse. Whether you have a basket ripped off under the foot of another racer in the heat of competition or you simply can’t get any purchase on icy corduroy or punky, rotten slush, you’ll know the instant something is awry with your poles.
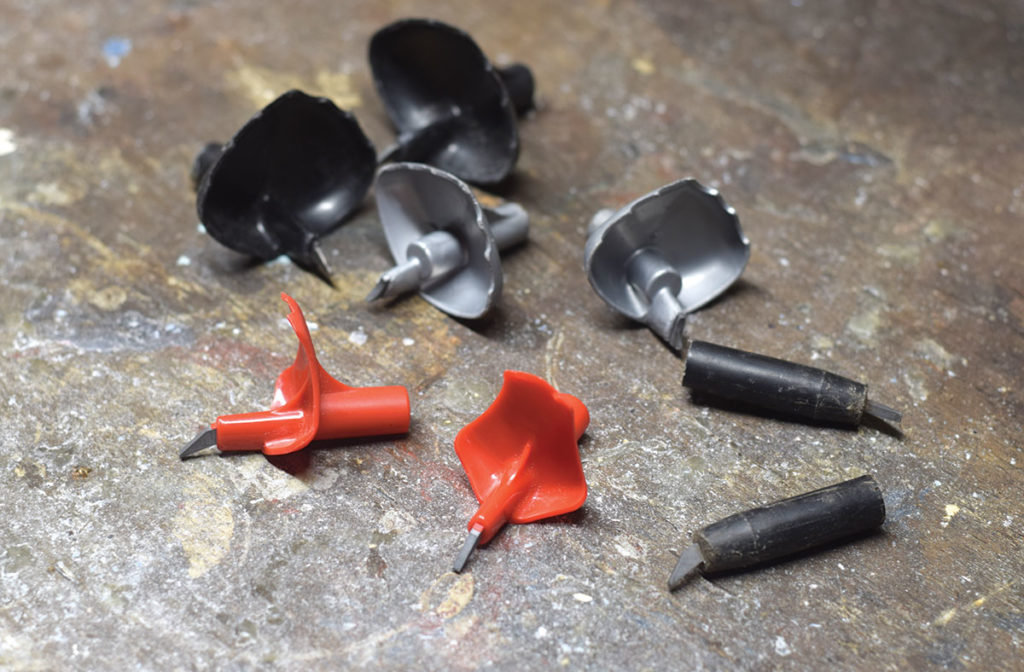
Pole tips come in all shapes and sizes, with a myriad of ways to affix them to your pole. Whether you have an interlocking screw-on system, or if you’re breaking out the glue, it’s important to understand the key elements of your pole baskets and the job they do. But, to fully get their impact, we need to first understand a pole tip’s effect on a pole’s overall swingweight.
You’ll often hear pole companies refer to an efficient swingweight: this refers to the effort needed to bring the tip of the pole out of the snow behind you and back to a starting position for another stroke.
Baseball bats and golf clubs provide other relevant examples of the effect of swingweight. Picture a baseball player warming up with donut-shaped weights on his bat, or a golfer taking practice swings with two clubs in her hand. In both cases, you are increasing the swingweight of the instrument to lighten and speed up the feel of the real swinging when it happens.
Ski poles achieve good swingweight in two ways: the taper of the pole shaft, and the size and weight of the pole tip. With a single pole, only one of these factors can be manipulated, and that’s why it’s important to match the pole tips you’re using with the snow you’re skiing on. Most pole companies make baskets in at least three sizes. The smallest baskets are useful only in the most solid snow. Medium baskets are great for most days you’ll be skiing, and are the best option to keep on your poles as a standard. The largest options are often referred to as “powder baskets” or “slush baskets.” These are nowhere near the pancake-sized, fully-round baskets of decades past, but they are large enough to have a significant effect on swingweight. The trade-off is that, in conditions when you resort to using them, no other baskets would let you push off as well due to the softness of the snow.
If your poles have tips featuring a screw-on or interlocking system, refer to the specific directions for swapping out one basket for another. Many newer poles, particularly higher-end racing models, feature this technology. It can make switching baskets faster than ever, and also safer for the poles since old methods involving heat and hammers are not involved.
If your pole tips are affixed with glue, there are several ways change to a different basket. The first and best option is using hot or boiling water. This is also the hardest to do at a remote ski venue, so keep that in mind for race day! For this process, first boil up some water. Using a small mug or cup, submerge your pole tips completely in the hot water. After a minute, the glue should loosen up and allow you to pull the basket off cleanly. The pole shaft itself should also still be hot, making it that much easier to affix a new basket.
If boiling water isn’t readily available, a heat gun is your next best option. Fire up the heat gun and keep the pole in continuous motion, spinning the tip as you gradually heat up the end. Keep the heat gun at least six inches from the pole basket itself; heating up too much too fast can melt the tips and poles. When sufficiently warm, pull off the basket. Always use a straight pulling motion: never twist the pole or basket!.This is an easy way to mutilate the carbon or fiberglass, resulting in poles a few inches shorter—even if that wasn’t your intent. This heat-gun method is the most common way to change pole baskets at a ski venue since you or another racer or coach is likely to have a heat gun in their wax kit.
The true “last-resort” option for changing pole tips is a blowtorch. This is another item that many skiers or coaches might have on-hand, particularly on a day involving classic skiing. This method is essentially the same as the heat gun method, although torches produce far more heat in a far more concentrated manner so be extra careful.
To affix a new basket with glue, simply warm some glue with your heat-gun or torch, or a hot glue gun itself. Some companies sell specific “pole glue,” but your standard hot glue from an arts and crafts store will work just fine. With a bit of molten glue on the pole shaft, pop on the tip and shift the pole upright. Hold onto the grip to ensure the basket is in the correct position, and let everything cool before you hit the trail.
Adam’s Bonus Tips for Tips
Be sure to know what size baskets your pole requires. Often, poles are designated as eight, nine, or 10 millimeters at the tip, and you can purchase baskets specific to these sizes.
In a pinch, the tailpipe of an idling car makes a good substitute for a heat gun. (Don’t try this in a garage!)
Carbide rollerski tips are vitally important if you’re using your poles on pavement and should always be put on for summer training.
Keeping a small lighter, some glue, and a spare pole tip in your water belt can be a lifesaver if you break a tip while on a long rollerski.
The metal on your pole tips can dull over time! Use a diamond stone to sharpen carbide rollerski tips, or a regular file for traditional winter pole tips.
—
Adam Terko is the head coach of Vermont’s Mansfield Nordic Club and has been skiing competitively (and writing about it) since before Fischer skis had holes in their tips. He’s also the technical editor of Cross Country Skier and writes the how-to column “Back Shop” in each issue.
Subscribe now to the print magazine to read Terko’s latest column and more at crosscountryskier.com/subscribe.